Opencart Google Tagmanager Extension
Installation
Installation
Download and Unzip the extension from Opencart
Follow these steps:
Step: 1
Upload the extension using Extension Installer or Unzip and upload the files from Upload Folder. If you are using extension installer please make sure you upload only the file that ends with .ocmod.zip
Step: 2
Refresh the modification cache using Modification page Refresh cache button.
For Opencart 3x / 4x
Opencart 3, 4 have template cache system we recommend clearing the cache. From the dashboard on your store admin, on the upper right side Clcik on Blue button with cog and refresh the caches.
Nitro, Lightning Cache, Lightspeed, Cloudflare
Clear / purge relevant cache after setup.
Important:
Make sure you disable any previously installed extension for Analytics that can conflict, if you have put manaual script tag on the theme pages, in Journal or any other 3rd party extension we recommend disabling or removing it.
Video Installation Guide
Here is the full video guide for Installation
Setting Google Tag Manager Container
We have provided a JSON Import file along with the download to help to setup your Google Tag Manager.
Video Guide
Step: 1
Login into your Google Tag Manager Account, select the website you are working on. Go to Admin
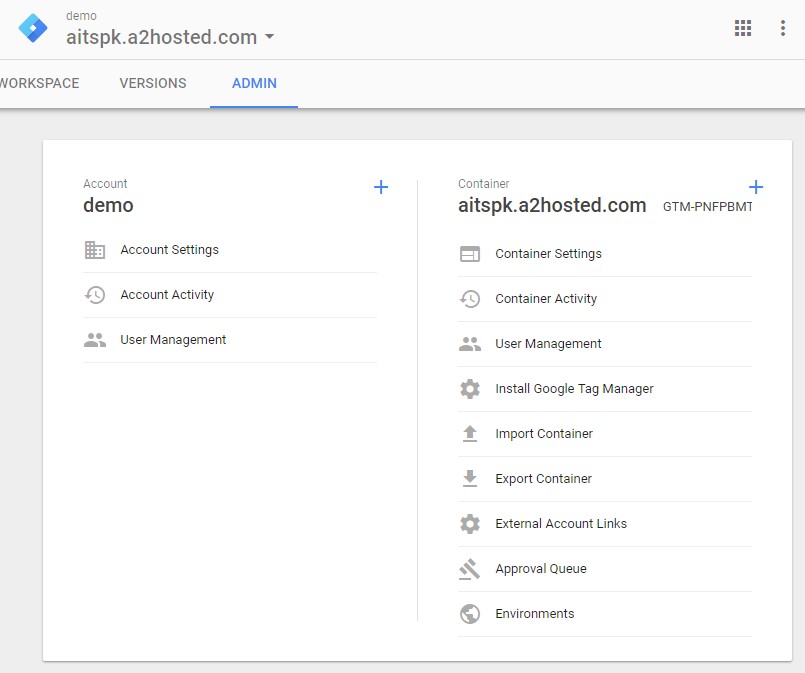
Click on Import Container
Select the file we have provided ending with .JSON
We recommend you select New Work Space and proceed the import.
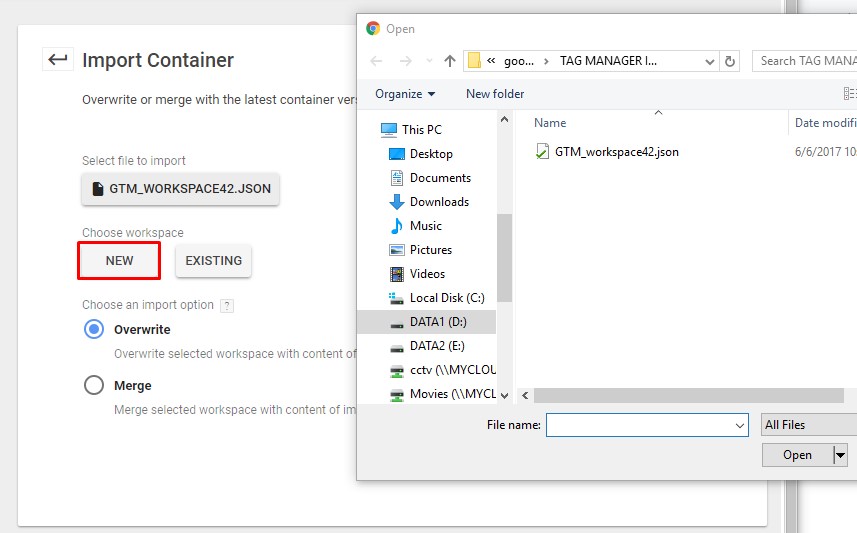
import the Json files provided in this zip, to import click admin, Go to Import and Import the file, you can create a new workspace or merge with existing. (Do at your own risk)
Step: 2
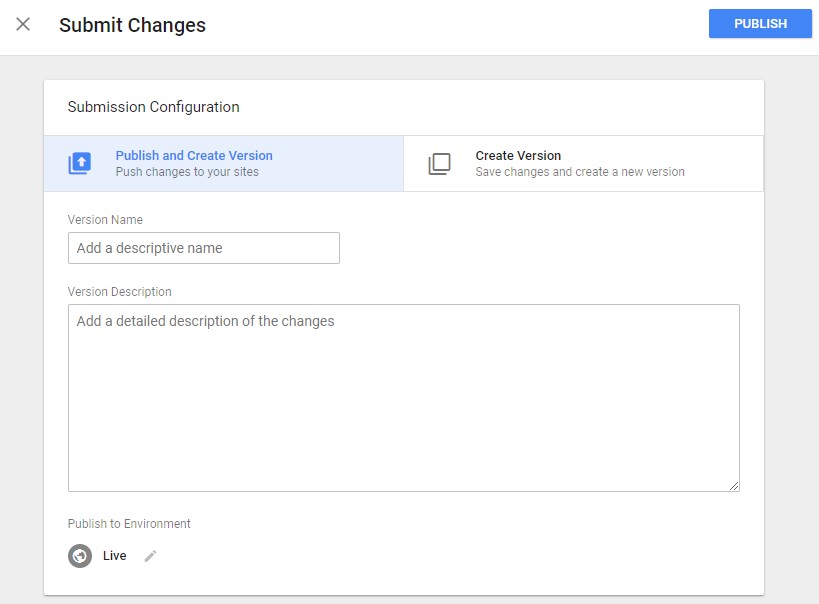
Publish the Work Space to make it available to use
Google Analytics GA4
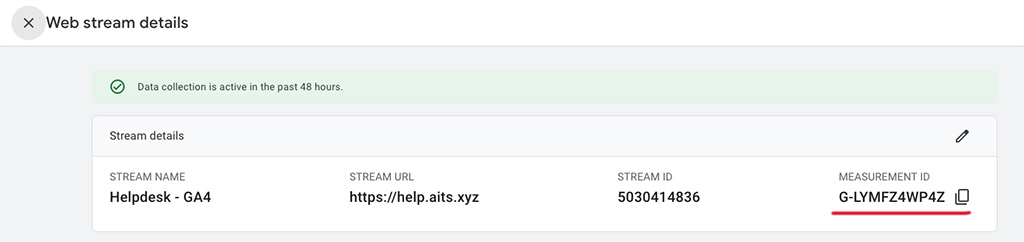
Copy the Measurement ID from Google Analytics GA4 Admin
In the extension admin settings Enable the GA4 tracking and paste the ID
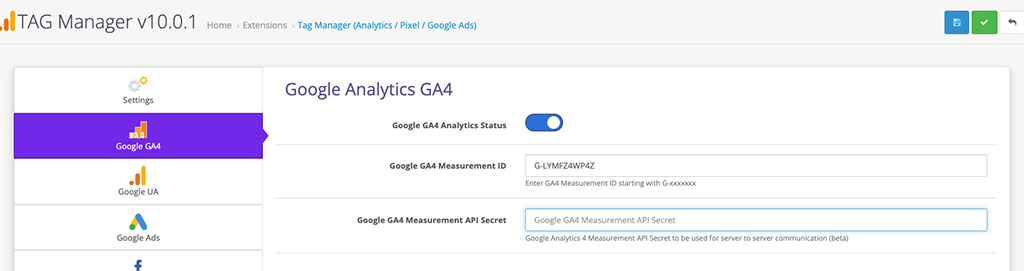
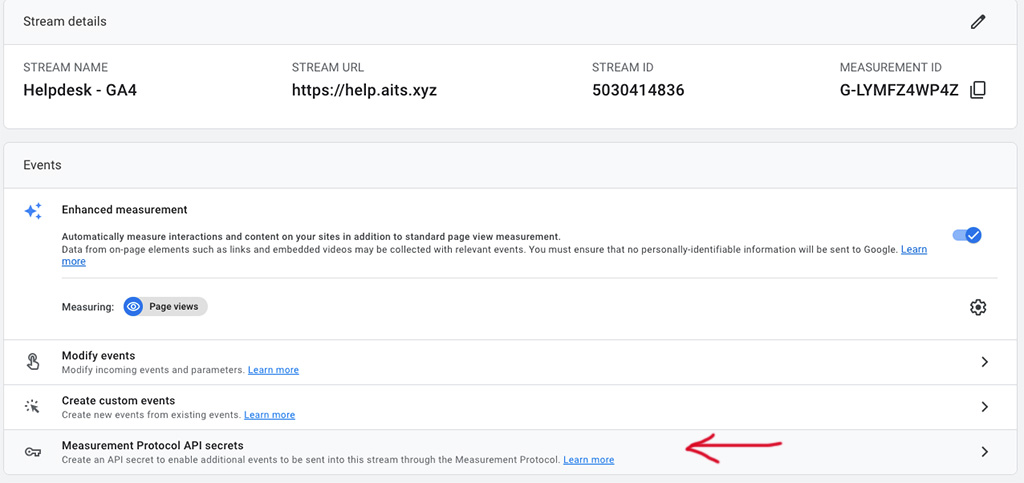
You can also Add API Secret to improve tracking, firstly you need to generate API Secret on Google Analytics admin
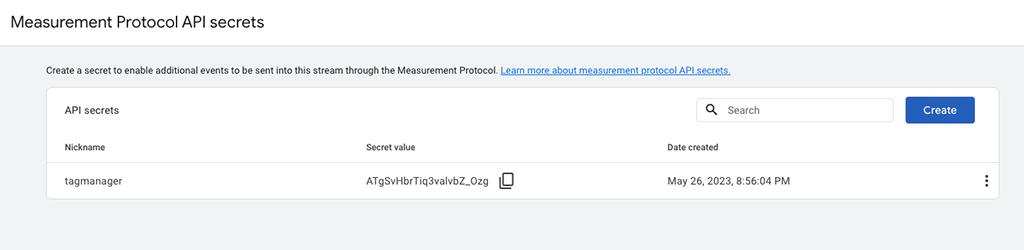
Copy the Secret Value
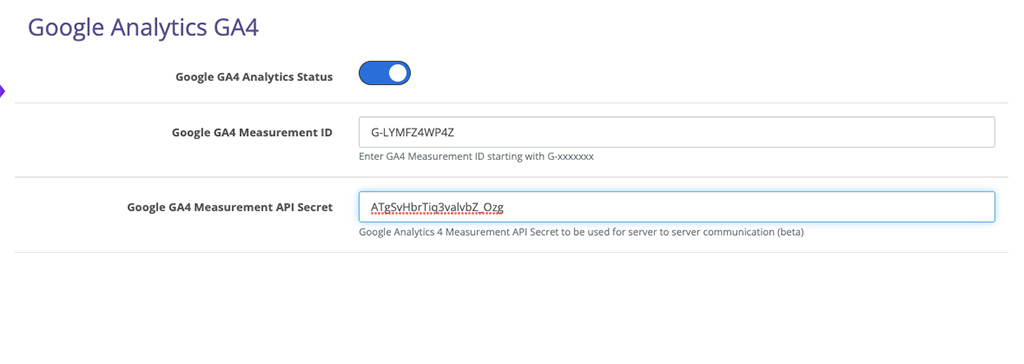
Paste it in the extension and save
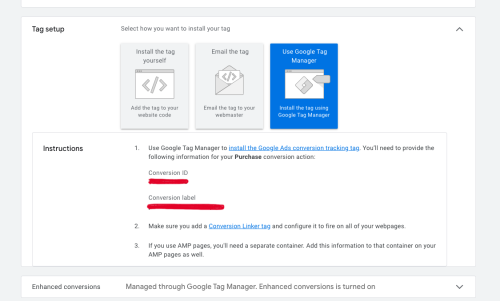
Google Ads Conversion Tracking
From the extension admin, go to Google Ads tab and enable Google Ads

Setting up Google Ads formally Adwords is fairly simple, you need to input Conversion Id and Conversion Label.
Both these values could be obtained from Google Ads --> Tools --> Conversion if you are not familiar with this you can see Google Ads Conversion ID and Label section
Google Ads Remarketing
Remarketing is a built in feature in Google Analytics where when using Enhanced Ecommerce you can create Audiences based on several criteria.
Dynamic Re-marketing on the other hand send specific data to Google which can be used in Google Ads and Facebook Pixel to create audiences.
Google Ads remarketing parameters
You can select custom parameters you want to sent to Google Ads for Audience list.
Remarketing to work properly you need to have Google Merchant Center / Facebook Catalog feed setup. Our extension do not provide any kind of feed
Page Cache plug-in
Opencart extension Lightning, Nitro, Rocket, Jet Cache all similar extensions generate html pages and serve these instead of processing the PHP again and again. In order to get correct analytics specially where varible data like user email etc. is required to be sent to Analytics or other platform it is important that these are not coming from a Cache page.
You need to make sure that you exclude the follwoing in JS Combine and Miniy exclude section so the Javascript section of the extension is not combine and moved down use the follwoing in JS exclusion
nitro-exclude
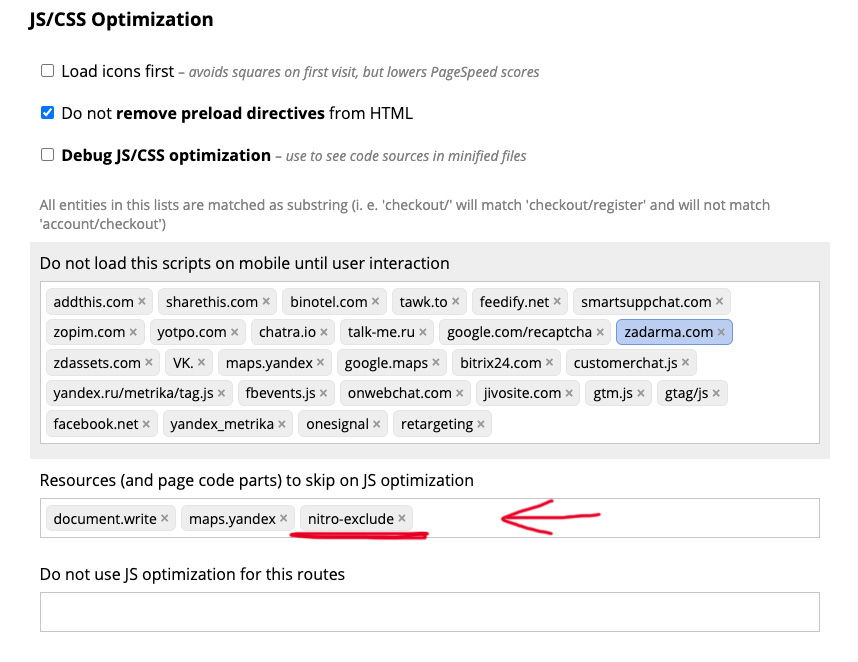
You also need to exclude the URL for route calling tagmanager/gtm
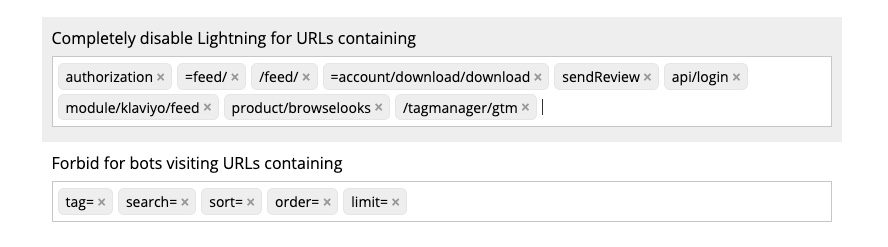
Full path for the extension for various version of Opencart are as under
Opencart 1.5, 2.0
route=module/tagmanager/gtm
Opencart 2.1
route=analytics/tagmanager/gtm
Opencart 2.3, 3.0
route=extension/analytics/tagmanager/gtm
Opencart 4
route=extension/tagmanager/analytics/tagmanager/gtm
Simliar exceptions are in all kind of cache plugins
Server Side Cache
For server side cache like Lightspeed, Cloudflare make sure you are doing the same exception atleast for tagmanager/gtm route which should be bypassed from any kind of cache.
Downlaod the extension files and extract them.
- Locate the Opencart 1.5x folder
- upload the content of the upload folder to your route of the website
- vqmod is required so make sure that you have vqmod already installed
- Login to Admin of your store
- Add User Permission to User group for newly uploaded files
- From the Extension section install the module
For complete installation guide view the video below
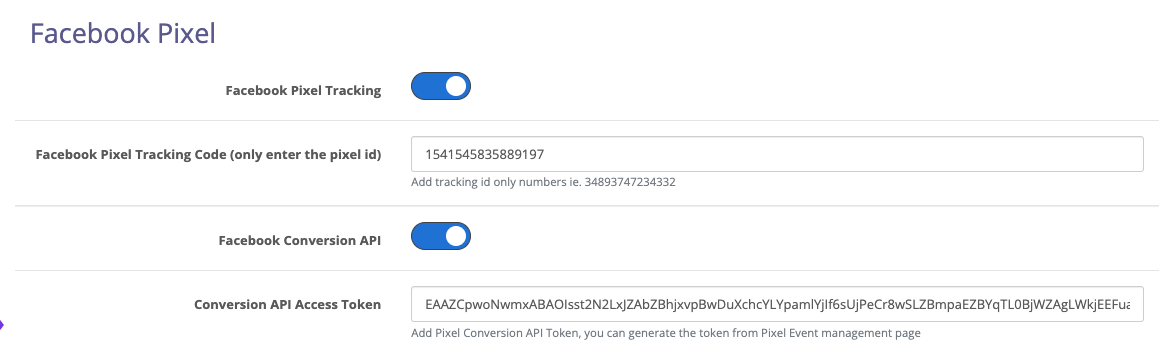
Firstly login to you Pixel Event dashboard and go to settings
![]()
Scroll down to Conversion section
![]()
If you have already setup the conversion parameters you can just Generate token or take the guided setup to setup Converison API and generate a token.
You then copy and paste the token to Extension settings
Once you have add the api token apply the settings, and move to main settings tab enable Debug API and apply the settings

Open you store and visit a product page, go back to Admin, and refresh the page once to reload the log files
Go to Logs secions if the log shows entries with response code 200 than the API has started working and everything is correct
2023-05-30 16:35:24 - Pixel API Response Code: 200
If the Response code is not 200 something is not right contact support.
Licence can be generated at https://licence.aits.xyz
Once the licence is generated and installed on a live domain it cannot be changed and you need to buy a new licence for a new domain.
Subdomain are not counted as new domain dev.yourdomain.com, test.yourdomain.com will not require additional licence.
Multistore Licence the same licence key generated for parent domain can be used to enable extension for multi stores.
When generating a licence do not include https:// or http:// or www in the start of the domain or include / at the end of domain:
Subdomain for 2 letter tlds .gr .hk etc. for domain like test.gr if you are not able to generate a licence for dev.test.gr contact us.
If case of any issue with licence or activation please contact us
signin to your Google Ads account, from the Top menu Go to Conversion section

If you haven't created any conversion you can create a new one.
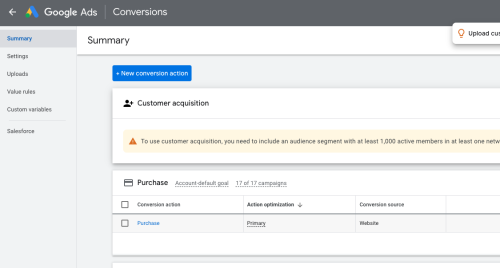
If you already have a Conversion setup then you can click on that
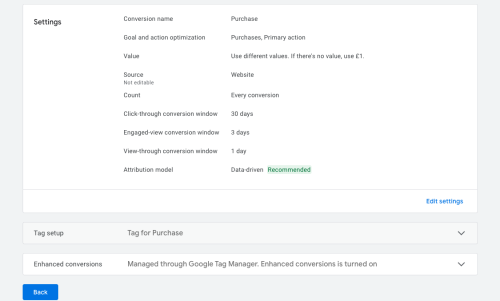
Once you are in you can scroll down and go to use Google Tag manager
Here you will find the Conversion ID and Label
You can copy the conversion id and conversion label in to extension settings.
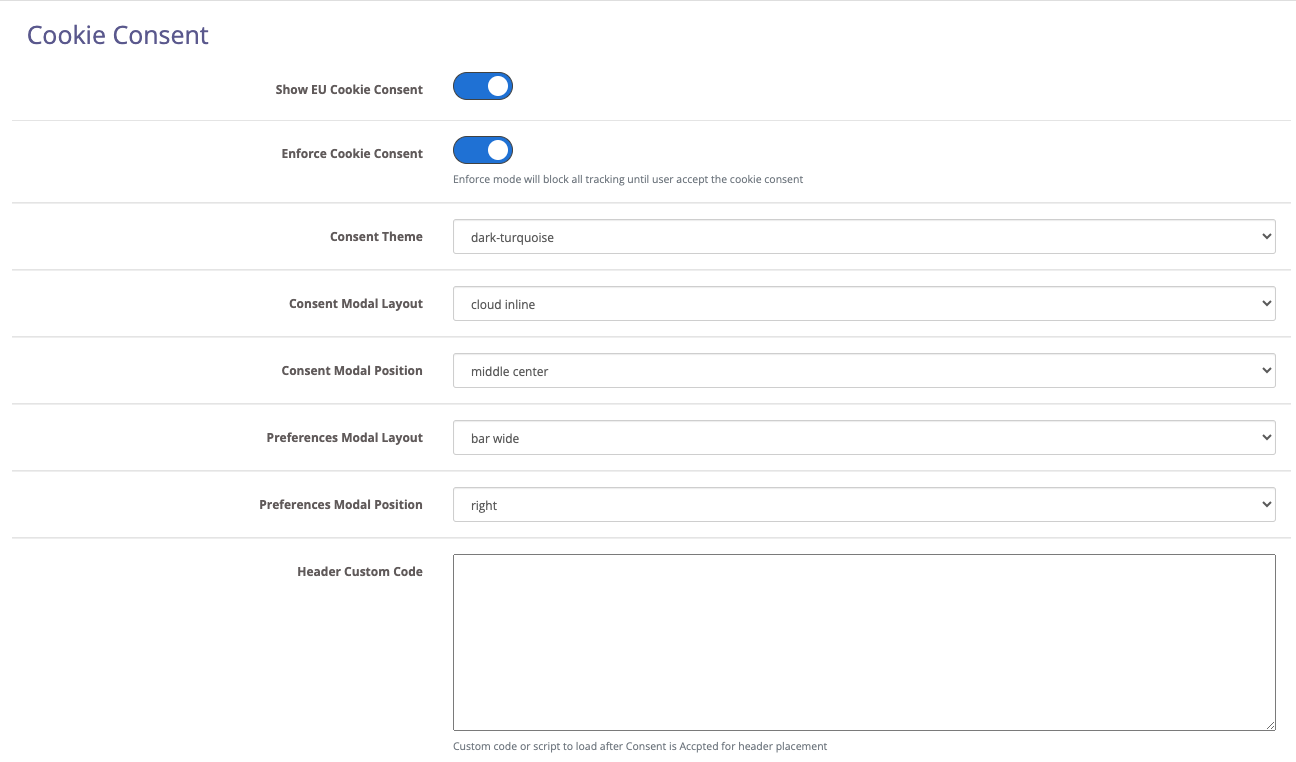
Cookie Consent v3 by cookieconsent.orestbida.com is provided in the extension.
The javascript is located in catalog/view/javascript/tagmanager folder.
The Cookie Consent section of the extension provide full control on how the consent look, text, theme colors etc.
Theme CSS is located in catalog/view/javascript/tagmanager/consent-themes.css which can be modified to fit as per your requirement
The new consent come with Main popup and Preference Popup. You can define the Layout and Position of both use the extension settings as shown in the image below:
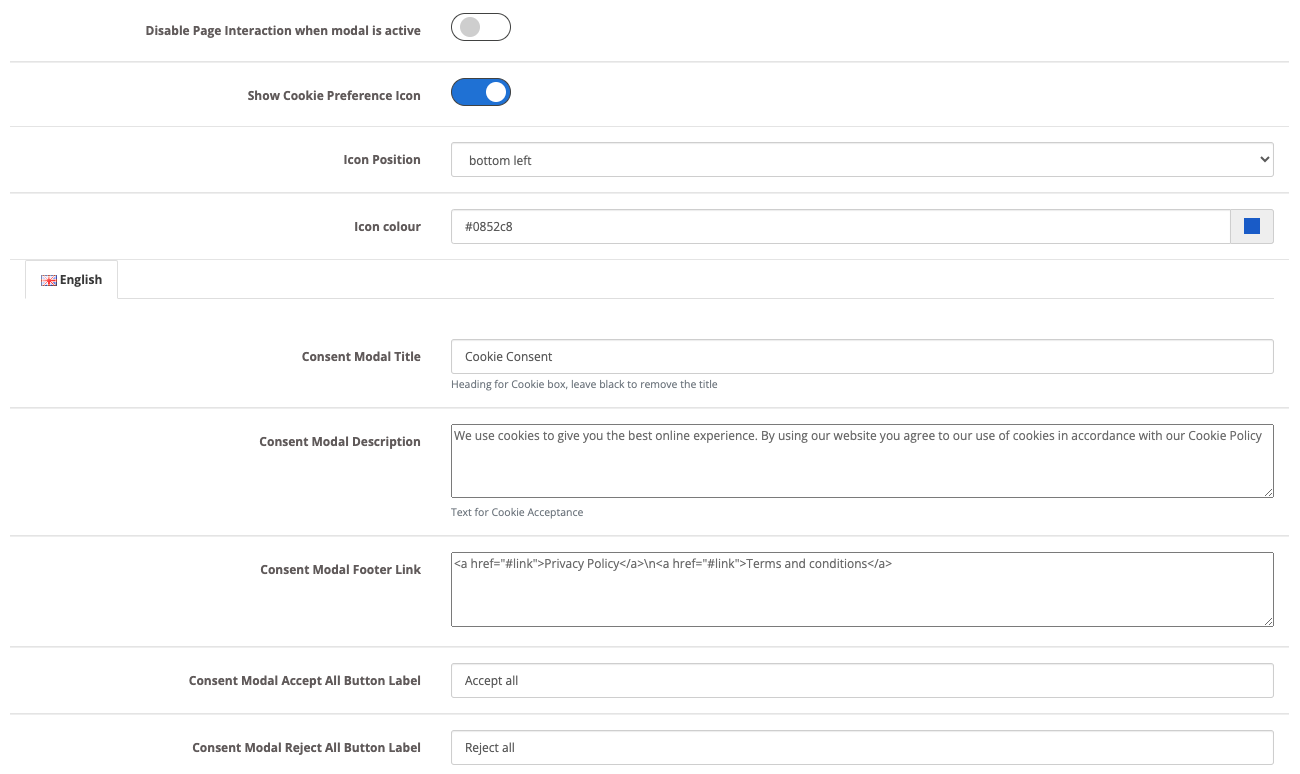
Switching on Disable page interaction will disable the page until the user accept or reject the cookie consent.
You can also show a badge to call the cookie setting modal. Also you can add below code in any link, div, button, img tag to call preference window
data-cc='show-preferencesModal'
- Enable Cookie consent will show a popup that can be customize
- Enable enforce mode to block all cookies from saving until the consent is granted, if the enforce mode is off, the banner will be displayed but all consent will be granted by default. Depending on your country you can use this for strict compliance.
Tip: Do not use ' or " in any text field. If you need to use ' or " put a \ before i.e. \' or \"
Google Consent mode v2
From version 10.6 Google Consent mode v2 is also implemented, two new configuration are passed to Google
ad_user_data
ad_personalization
depending on client selection they will be sent denied or granted for Google to allow collection of additional advertising data
gtag('consent', 'default', {
  'ad_storage': 'denied',
  'ad_user_data': 'denied',
  'ad_personalization': 'denied',
  'analytics_storage': 'denied'
});
url_passthrough
When cookie storage is denied for analytics or ads the url_passthrough parameter is set for gtag to pass GCLID or DCLID via URL parameters across pages. (implemented from version 10.6)
gtag('set', 'url_passthrough', true);
Redact ads data
If marketing cookies are denied ads_data_redaction is set to pass
When ads_data_redaction is true and ad_storage is denied, ad click identifiers sent in network requests by Google Ads and Floodlight tags will be redacted. Network requests will also be sent through a cookieless domain. (implemented from version 10.6)
gtag('set', 'ads_data_redaction', true);